Programming blog

This is a programming blog


  • Home

  • Tags

  • Categories

  • Archives

  • Sitemap

  • Search

[Java] Flow control in try catch finally

Posted on 2018-05-25 |

在正常情況下,當執行完 try 的最後一行或是要把控制權轉交給它的呼叫者 (return 或丟出 exception)時,會執行 finally ,當 finally 執行完畢,再把控制權轉交給 try。

但是當在 finally 裡面寫下 return, throw exception, continue, break 會沒有辦法把控制權轉交給 try,造成不可以預期的結果。所以千萬不要在 finally 裡面 return 或丟出 exception,雖然現在的 IDE 都會聰明到幫你檢查出來。

主要原因 try-finally 轉成 Java byte code 時候,finally 是一個副程式,當 try 執行完畢時候就會去呼叫 finally 副程式。當 finally 副程式執行完畢,會跳到 try 的記憶體位置。但在 finally 裡面加了這些return, throw exception, continue, break,它就提前跳出程式回不到正確的位置。

另外,當 try 裡面強制中斷 JVM 或是非預期的情況發生提早結束 (這裡所指的非預期的情況不是丟出 exception,而是當下的 thread 突然死掉或是 JVM 突然有問題這類的。),finally 是不會執行的。

Try-finally clause

1
2
3
4
5
6
7
try {
// Block of code with multiple exit points
}
finally {
// Block of code that is always executed when the try block is exited,
// no matter how the try block is exited
}

Example 1

1
2
3
4
5
6
7
8
9
10
11
12
int i = 0; 
try {
i = i + 1;
System.out.println(i);
}
finally{
i = i + 2;
System.out.println(i);
}

//1
//3

Example 2

1
2
3
4
5
6
7
8
9
10
11
12
13
14
public static void main(String[] args){
System.out.println(doSomeThing());
}

private static int doSomeThing(){
try {
return 1;
}
finally{
return 2;
}
}

//2

Example 3

1
2
3
4
5
6
7
8
9
10
11
12
13
14
15
16
17
public static void main(String[] args) throws Exception {
System.out.println(doSomeThing(true));
}

private static int doSomeThing(boolean bVal) throws Exception {
try {
if (bVal) {
return 1;
}
return 0;
} finally {
System.out.println("Got old fashioned.");
}
}

// Got old fashioned.
// 1

Example 4

1
2
3
4
5
6
7
8
9
10
11
12
13
public static void main(String[] args) throws Exception {
System.out.println(doSomeThing());
}

private static int doSomeThing() throws Exception {
try {
throw new Exception("from try");
} finally {
throw new Exception("from finally");
}
}

// Exception in thread "main" java.lang.Exception: from finally

Example 5

1
2
3
4
5
6
7
8
9
10
11
12
13
14
15
16
17
18
19
20
21
22
public static void main(String[] args) throws Exception {
System.out.println(doSomeThing(true));
}

private static int doSomeThing(boolean bVal) throws Exception {
int i = 0;
while (true) {
try {
try {
i = 1;
} finally { // the first finally clause
i = 2;
}
i = 3;
return i; // this never completes, because of the continue
} finally { // the second finally clause
if (i == 3) {
continue; // this continue overrides the return statement
}
}
}
}

Example 6

1
2
3
4
5
6
7
8
9
10
11
12
13
public static void main(String[] args) throws Exception {
System.out.println(doSomeThing());
}

private static int doSomeThing() throws Exception {
try {
System.exit(1);
} finally {
throw new Exception("from finally");
}
}

// terminates JVM and doesn't execute finally block

References

Try-finally clauses defined and demonstrated

[Scala] The importance of recursion

Posted on 2017-04-26 | Edited on 2017-05-14 | In Scala |

遞迴

在functional programming世界中是不准許有mutable變數,意味著我們熟悉的 while, for 迴圈都是禁止使用。
那我們應該怎麼辦呢? 這邊會舉個數個例子,來解釋是透過遞迴方式來完成 while 或 for 迴圈。

從一個串列中找出最大值

如果在 Java 我們會怎麼做呢?

  1. 宣個一個變數(max)存放目前的最大值
  2. 透過while 或 for 迴圈,將串列中的每個元素跟我們宣告的變數(max)比大小
    2.1 若元素的值大於max,max的值就改為此元素的值
    2.2 若元素的值小於或等於max,不做任何事
1
2
3
4
5
6
var max = Int.MinValue

for(i <- List(1, 2, 3, 4, 5)){
if(i > max)
max = i
}

透過遞迴方式我們會怎麼解決呢?

1
2
3
4
5
6
7
8
9
10
11
12
13
findMax(List(1, 2, 3, 4, 5))

def findMax(list: List[Int]): Int = {
list match{
// 假如是空的串列,我們回傳0
case Nil => 0
// 假如只有一個元素的串列,那最大值就為該元素
case h :: Nil => h

// 主要邏輯
case h :: t => Math.max(h, findMax(t))
}
}
  • 在迴圈版本中,逐一每個元素跟某一個mutable變數比大小。
  • 在迴遞版本中,第一個元素跟去除第一個元素的串列的最大值比大小。

迴遞的寫法更是簡潔和表達出整個程式主要邏輯,我們再來多試看看幾個題目。

從一個串列中找出最小值

做法跟找出最大值類似,第一個元素跟去除第一個元素的串列的最小值比大小。

1
2
3
4
5
6
7
8
9
10
11
12
13
findMin(List(1, 2, 3, 4, 5))

def findMin(list: List[Int]): Int = {
list match{
// 假如是空的串列,我們回傳0
case Nil => 0
// 假如只有一個元素的串列,那最小值就為該元素
case h :: Nil => h

// 主要邏輯
case h :: t => Math.min(h, findMin(t))
}
}

檢查一個串列中是否存在某個特定值

檢查第一個元素是否等於目標值或是去除第一個元素的串列有目標值

1
2
3
4
5
6
7
8
9
10
11
12
13
find(List(1, 2, 3, 4, 5), 5)

def find(list: List[Int], target: Int): Boolean = {
list match{
// 假如是空的串列,回傳false
case Nil => false
// 假如只有一個元素的串列,而且該元素等於target,回傳true
case h :: Nil if (h == target) => true

// 主要邏輯
case h :: t => (h == target) || find(t, target)
}
}

反轉一個字串

先反轉去除第一個字元的串列,之後再將第一字元放在最後面

1
2
3
4
5
6
7
8
9
10
11
12
13
reverse("I should learn scala seriously!".toList)

def reverse(list: List[Char]): String = {
list match {
// 假如是空的串列,回傳false
case Nil => ""
// 假如只有一個元素的串列,回傳該元素
case h :: Nil => h.toString

// 主要邏輯
case h :: t => reverse(t) + h
}
}

判斷一個字串是否為另外一個字串的子字串

子字串的定義:字數,內容和順序需要符合,空字串為任何字串的子字串
例如:

  • “abc” 為 “XXXYYYabc”的子字串
  • “XXXY” 為 “XXXYYYabc”的子字串
  • “” 為 “XXXYYYabc”的子字串
  • “ABC” 不為 “XXXYYYabc”的子字串
  • “QQWW” 不為 “XXXYYYabc”的子字串
  • “XXXaYYY” 不為 “XXXYYYabc”的子字串

先比較主要字串和子字串的第一個字母是否一樣,

  • 若一樣則這兩個字串去除第一個字母繼續比
  • 若不一樣,主要字串去除第一個字母和子字串繼續比

例如:
主要字串: “abcdefghi”
子字串: “abc”
檢查主要字串前三個字母(abc)是否和子字串(abc)一樣,若一樣就回傳true

主要字串: “abcdefghi”
子字串: “defgh”
檢查主要字串前五個字母(abcde)是否和子字串(defgh)一樣,若不一樣,
則 “bcdefghi” 和 “defgh” 繼續比

1
2
3
4
5
6
7
8
9
10
11
12
13
14
println(isSubString("I should learn scala seriously!".toList, "scala".toList))
println(isSubString("I should learn scala seriously!".toList, "XXOO".toList))
println(isSubString("I should learn scala seriously!".toList, "scaxxyyla".toList))

def isSubString(original: List[Char], target: List[Char]): Boolean = {
(original, target) match {
case (Nil, _) => false
case (_, Nil) => true
case (o :: Nil, t :: Nil) if (o == t) => true
case (o :: Nil, t :: Nil) if (o != t) => false
case (o, t) if (o.take(t.length) == t) => true
case (oh :: ot, t) => isSubString(ot, t)
}
}

將一個串列由小排到大

我們來實作Quicksort

  1. 從數列中挑出一個元素,稱為 “基準”(pivot)。
  2. 重新排序數列,所有比基準值小的元素擺放在基準前面,所有比基準值大的元素擺在基準後面(相同的數可以到任一邊)。在這個分割結束之後,該基準就處於數列的中間位置。這個稱為分割(partition)操作。
  3. 遞迴地(recursively)把小於基準值元素的子數列和大於基準值元素的子數列排序。
1
2
3
4
5
6
7
8
9

quicksort(List(4, 3, 2, 9, 10))
def quicksort(list: List[Int]): List[Int] = {
list match {
case Nil => Nil
case h :: Nil => List(h)
case h :: t => quicksort(t.filter(_ <= h)) ::: h :: quicksort(t.filter(_ > h))
}
}

寫出費氏數列

何謂費氏數列:費氏數列

1
2
3
4
5
6
7
8
9
fib(6)

def fib(n: Int): Int = {
n match {
case 0 => 0
case 1 => 1
case _ => fib(n - 1) + fib(n - 2)
}
}

經過幾次的練習,我們應該大概可以慢慢掌握到怎麼運用遞迴來達到迴圈目的。

  1. 先把主要邏輯寫出來
  2. 再把邊界條件設好,沒有邊界條件就會無窮的跑下去…
    遞迴主要是透過自我呼叫,把每一步的狀態放在 stack,等走到邊界回傳邊界值或完成邊界條件後,再回溯回去。

把問題透過Divide and conquer方式,
大問題分解成數個小問題,若小問題規模較小且易於解決時,則直接解。否則,遞歸地解決各小問題。
最後再將每個小問題的結果逐一合併起來。

遞迴的寫法很簡潔,但是最大的問題是效能不好和容易 Stack Overflow。
主要原因是會去嘗試走所有可能的路徑而且把每一個狀態放在stack,當狀態一多就爆了。
去嘗試走所有可能的路徑也是造成效能不好的原因。

假如:

  1. 去嘗試走所有可能的路徑不多,但是每一個步計算很花時間,遞迴容易轉換成非同步程式。

以排序為例,一個串列數量小於一千,我們可以使用Insertion Sort;大於一千改使用Quicksort:

1
2
3
4
5
6
7
8
9
10
11
12
13
def sort(list: List[Int]): List[Int] = {
if(list.length < 1000){
// 需要大量時間計算才可以得出結果
insertionSort(list)
}
else{
list match {
case Nil => Nil
case h :: Nil => List(h)
case h :: t => sort(t.filter(_ <= h)) ::: h :: sort(t.filter(_ > h))
}
}
}

我們可以輕易將它轉換成非同步程式。

1
2
3
4
5
6
7
8
9
10
11
12
13
def sort(list: List[Int]): Future[List[Int]] = {
if(list.length < 1000){
// 需要大量時間計算才可以得出結果
Future(insertionSort(list))
}
else{
list match {
case Nil => Future(Nil)
case h :: Nil => Future(List(h))
case h :: t => Future(sort(t.filter(_ <= h)) ::: h :: sort(t.filter(_ > h)))
}
}
}

非遞迴的版本就很難改了,因為主要存在共享的mutable變數,多個thread會共享同一個變數,就需要做同步處理。
同步問題沒有小心處理,結果很容易出錯。

  1. 嘗試走所有可能的路徑很多

例如:計算第五十個費氏數列
根據計算費氏數列的遞迴公式,n = 50 的樹狀結構會相當大。我們可以透過 Tail recursion 來解決。
把上一個狀態的結果直接當成帶入參數,而不是依賴上一個狀態的結果。

因為 fib(n) = fib(n - 1) + fib(n - 2),假如可以把 fib(n - 1) 和 fib(n - 2) 當參數帶入,
這樣就可以馬上得出 fib(n),而不是等算完 fib(n - 1) 和 fib(n - 2) 後才可以得出 fib(n)。

import scala.annotation.tailrec

fib(0, 1, 5)

@tailrec
def fib(previous: Int, current: Int, n: Int): Int = {
  n match {
    case 0 => previous
    case 1 => current
    case _ => fib(current, previous + current, n - 1)
  }
}

有興趣的讀者可以到 ScalaKitchen 試玩看看,也有提供中文版本的Scala入門教學。

[Scala] Use Either to hand error cases

Posted on 2017-02-15 | Edited on 2017-02-16 | In Scala |

在OOP的語言中,我們exception來表達程式錯誤或是系統crash.Exception又可以分為Checked Exception 和 UnChecked Excpetion.

  • Checked Exception: 會將要丟出的excpetion寫在function的signature.
    例如:

    1
    interface Foo() throws XXXException, YYYException
  • UnChecked Excpetion: 要丟出的excpetion不會寫在function的signature,呼叫function的人需要知道有exception要處理.

Checked Exception會違反Open/Closed Principle,當有新增丟出的excpetion,需要修改interface signature;UnChecked Excpetion則是需要知道有哪些exception需要處理.

這兩種exception孰好孰壞,在 Clean code: a handbook of agile software craftsmanship, Robert C. Martin 有提到:

1
2
3
4
5
6
The debate is over. For years Java programmers have debated over the benefits and liabilities of checked exceptions. When checked exceptions were introduced in the first version of Java, they seemed like a great idea. The signature of every method would list all of the exceptions that it could pass to its caller. Moreover, these exceptions were part of the type
of the method. Your code literally wouldn't compile if the signature didn't match what your code could do.

At the time, we thought that checked exceptions were a great idea; and yes, they can yield some benefit. However, it is clear now that they aren't necessary for the production of robust software. C# doesn't have checked exceptions, and despite valiant attempts, C++ doesn't either. Neither do Python or Ruby. Yet it is possible to write robust software in all of these languages. Because that is the case, we have to decide—really—whether checked exceptions are worth their price.

Checked exceptions can sometimes be useful if you are writing a critical library: You must catch them. But in general application development the dependency costs outweigh the benefits

在Java中建議使用UnChecked Excpetion,但是這會導致另外一個災難…

  1. 呼叫者不知道會丟出exception
  2. 呼叫者不知道有哪些excpetion要處理,當call chain很深的時候更是糟糕…
  3. 到處充滿了 try{...} catch{...}

相信使用Java開發的工程師應該感觸良多,尤其是在維護舊專案.一個call chain長達十幾層,每一層丟的excpetion都不一樣,有些層會處理exception,有些又不會,最後的大絕招就是每一層都加 try{...} catch{...}.

例外處理在OOP是一個很重要的議題,沒有謹慎處理很容易造成維護困難和發生問題不容易找到問題點.
因為Exception是有side effect,在FP是不被准許的.所以在pure FP程式中是看不到excpetion和 try{...} catch{...}.

Either

我們可以透過 Either 來達成,Left 放錯誤的物件,Right 放正確的物件:

1
2
3
4
5
6
7
8
9
sealed abstract class Either[A, B]
final case class Left[+A, +B](a: A) extends Either[A, B]
final case class Right[+A, +B](b: B) extends Either[A, B]

// for exmple
type Error = String

val result = Right[Error, Int](123)
val error = Left[Error, Int]("Something wrong!!!")

我們可以把正確的結果或錯誤放到 Either 這個容器,呼叫者可以清楚知道有需要處理錯誤情況,再來程式碼不再到處充斥 try{...} catch{...}.

我們使用四則運算來當範例,如何使用 Either

1
2
3
4
5
6
7
8
9
10
11
12
13
14
15
16
17
18
19
20
21
22
23
24
25
26
27
28
29
30
31
32
33
34
35
36
37
38
39
40
41
42
def div(a: Double, b: Double): Either[String, Double] = {
if(b == 0) Left[String, Double]("Can't divide by 0 !!!")
else Right[String, Double](a / b)
}

def add(a: Double, b: Double): Either[String, Double] = {
Right[String, Double](a + b)
}

def minus(a: Double, b: Double): Either[String, Double] = {
Right[String, Double](a - b)
}

def mul(a: Double, b: Double): Either[String, Double] = {
Right[String, Double](a * b)
}

// ((((1 + 2) * 3) / 4) - 5)

val result = for {
r1 <- add(1, 2)
r2 <- mul(r1, 3)
r3 <- div(r2, 4)
r4 <- minus(r3, 5)
} yield {
r4
}

// result: scala.util.Either[String,Double] = Right(-2.75)

// ((((1 + 2) * 3) / 0) - 5)

val result = for {
r1 <- add(1, 2)
r2 <- mul(r1, 3)
r3 <- div(r2, 0)
r4 <- minus(r3, 5)
} yield {
r4
}

// result: scala.util.Either[String,Double] = Left(Can't divide by 0 !!!)

根據上面簡單的範例,這樣的寫法很明顯優於傳統OOP用excpetion來處理錯誤:

  • 不再有 try{...} catch{...} 充斥在每個地方.
  • 呼叫者可以根據fucntion signature知道是否會產生錯誤.
  • 更可以專心在商業邏輯,而不用花多餘的心力在處理例外.

Try

1
2
3
4
5
sealed abstract class Try[+T]

final case class Failure[+T](exception: Throwable) extends Try[T]

final case class Success[+T](value: T) extends Try[T]

Try 也是類似於 Either 的context,有興趣的讀者可以試用看看.在實務上大部分都採用 Either,不採用 Try的原因是:

  • 沒有辦法對exception做 exhaustive pattern match,當是Failure的時候,呼叫者不知道有哪些exception會丟出,只知道會丟出一個 Throwable class.

使用 Either 我們可以自訂Error type,當失敗時候就可以對Error type做 exhaustive pattern match,依據不同的錯誤做不同的處理.

[Scala] How to use Option correctly

Posted on 2016-12-20 | Edited on 2017-05-18 | In Scala |

對於Scala我一直把它當成進階版本的Java,當越來越了解Functional Programming的精神,才發現之前想法還蠻天真的.

可以從如何正確使用 Option ,讓我們慢慢來進入Functional Programming的世界.

先從一個簡單的API實例來開始: 假如有一個API,Admin使用者可以找出某個國家的所有使用者;不是Admin使用者就回傳空字串.

使用者會帶上 userName , password 和 country 呼叫此API,這個API會

  1. 檢查格式是否正確
  2. 查詢資料庫是否有使用者
  3. 若有,檢查 userType 使否為 Admin
  4. 根據 country 去資料庫撈取該國家的所有使用者
  5. 將結果轉成 json 放到 http response

先定義 Data Type:

1
2
3
4
5
6
7
8
9
10
11
12
13
14
15
16
17
18
19
20
21
sealed trait Name
final case class UserName(name: String) extends Name

sealed trait Password
final case class MD5Password(plainText: String) extends Password

sealed trait Country
final case object TAIWAN extends Country
final case object CHINA extends Country

sealed trait UserType
final case object ADMIN extends UserType
final case object EMAIL extends UserType
final case object PHONE extends UserType


sealed trait Account {
val name: String
}
final case class AccountWithCredential(name: UserName, password: Password, userType: UserType) extends Account
final case class AccountWithProfile(name: UserName, country: Country, age: Int) extends Account

這樣的 Data Type 也是所謂的 Algebraic Type,
以 Account 為例:

  • 它有兩種 subtype AccountWithCredential 和 AccountWithProfile,為 Account 的 Sum Type
  • 各種不同 subtype 有它們的參數,也稱之 Product Type

這種定義方式有點像Java世界中的 Value Object,把資料和行為分開是有好處的,避免資料和行為耦合過緊.Design Pattern 也是透過pattern去分離資料和行為.

再來我們來定義行為:

1
2
3
4
5
6
7
8
9
10
11
trait Repo {
def login(name: UserName, password: Password): Option[AccountWithCredential]

def getAccountsByCountry(country: Country): Option[List[AccountWithProfile]]
}

object Repo extends Repo {
def login(name: UserName, password: Password): Option[AccountWithCredential] = ???

def getAccountsByCountry(country: Country): Option[List[AccountWithProfile]] = ???
}

login 的回傳值為一個 Option context,裡面裝著 AccountWithCredential.

  • 若有找到就回傳 Some[AccountWithCredential]
  • 若沒有找就回傳 None

在 Java 7 之前的版本會定義找不到會回傳 Null,Null 會造成語意不清和程式碼充斥著一堆檢查是否為 Null 的程式碼.
我們可以透過 Null Object pattern 來解決這個問題.
在 Scala 或 Java 8 則是透過 Option / Optional data type來解決之.

我們可以實作API:

1
2
3
4
5
6
7
8
9
10
11
12
13
14
15
16
17
18
19
20
21
22
23
24
25
26
27
28
29
30
31
32
33
34
35
36
37
38
39
40
41
42
43
44
45
46
47
48
object Api extends App {
val name: Option[UserName] = parse(UserName(args(0)))
val password: Option[MD5Password] = parse(MD5Password(args(1)))

// Step1: login
// Step2: check isAdmin == true
// Step3: get accounts by country
// Step4: convert accounts to json
// Step5: add json to HttpResponse

if (name.isEmpty) throw new RuntimeException("bad id")
if (password.isEmpty) throw new RuntimeException("bad password")
val json: Option[String] = getJsonProfile(name.get, password.get, CHINA)
if (json.isDefined) {
returnHttpResponse(json.get)
} else {
returnHttpResponse("")
}

private def parse[A](a: => A): Option[A] = ???

private def getJsonProfile(name: UserName,
password: Password,
country: Country): Option[String] = {
val accountWithCredential: Option[AccountWithCredential] =
Repo.login(name, password)
if (accountWithCredential.isDefined) {
accountWithCredential.get.userType match {
case ADMIN =>
val accounts: Option[List[AccountWithProfile]] =
Repo.getAccountsByCountry(country)
if (accounts.isDefined) {
listToJson(accounts.get)
} else {
None
}
case _: UserType => None
}
} else {
None
}
}

// convert a list of Account to json String
private def listToJson[A](list: List[A]): Option[String] = ???

private def returnHttpResponse(message: String): Unit = ???
}

這個版本利用 isDefined 去判定是否為空值,這樣的寫法跟使用 Null 當回傳值一樣,在這個版本完全看不出使用 Option 好處,反而顯得冗餘.

我們改寫另外一個版本 getJsonProfile :

1
2
3
4
5
6
7
8
9
private def getJsonProfile(name: UserName, password: Password, country: Country): Option[String] = {
Repo.login(name, password).flatMap(
account => {
if (account.userType == ADMIN) {
Repo.getAccountsByCountry(country).flatMap(profiles => listToJson(profiles))
}
else None
})
}

我們利用 flatMap 來幫串接,而不是嘗試取得 Option 裡面的值,Option 的 flatMap 的 signature 為 A => Option[B].

例如: getAccountsByCountry 需依賴 login 的結果,才可以進行之後的動作.我們是透過 flatMap 將這兩個動作串接起來,
這樣就可以避免一堆冗餘 if else 檢查.

再舉一個抽象的例子:

1
2
3
4
5
6
7
def A(a: A): Option[B] = ???
def B(b: B): Option[C] = ???
def C(c: C): Option[D] = ???

def total(input: Option[A]): Option[D] = {
input.flatMap(A(_).flatMap(B(_).flatMap(C(_))))
}

可以透過 flatMap 串接 A, B, C 這三個function,假如用 isDefined 來串接,程式碼的可讀性和維護性會大幅下降.
在 Function Programming中,常見的pattern會將值放到一個context裡面,在使用時候並不會將值取出來,而是透過 flatMap 或 map 來轉換context裡面的值.

我們可以傳入 parse 過後的結果,將所有的function串接在一起:

1
2
3
4
5
6
7
8
9
10
11
12
13
14
15
16
17
18
19
20
21
22
23
24
25
26
27
28
object Api extends App {
val name: Option[UserName] = parse(UserName(args(0)))
val password: Option[MD5Password] = parse(MD5Password(args(1)))


val json: Option[String] = getJsonProfile(name, password, CHINA)
if (json.isDefined) {
returnHttpResponse(json.get)
} else {
returnHttpResponse("")
}

private def getJsonProfile(name: Option[UserName], password: Option[Password], country: Country): Option[String] = {
name.flatMap(name1 =>
password.flatMap(password1 =>
Repo.login(name1, password1).flatMap(
account => {
if (account.userType == ADMIN) {
Repo.getAccountsByCountry(country).flatMap(profiles => listToJson(profiles))
}
else None
})
))
}

// other functions
// ...
}

可以發現串接的function越多,會越寫越右邊,有點類似 Callback hell ,或許也可以稱為 flatMap hell…
好險Scala有提供很好的 syntax sugar for comprehension 來解決 flatMap hell

1
2
3
4
5
6
7
8
9
10
11
12
13
14
15
16
17
object Api extends App {
val name: Option[UserName] = parse(UserName(args(0)))
val password: Option[MD5Password] = parse(MD5Password(args(1)))

for {
name1 <- name
password1 <- password
account <- Repo.login(name1, password1).filter(a => a.userType == ADMIN)
profiles <- Repo.getAccountsByCountry(CHINA)
json <- listToJson(profiles)
} yield {
returnHttpResponse(json)
}

// other functions
// ...
}

比較第一個版本和最後一個版本的程式碼,最後一個版本可以很清楚表達整個程式意圖,而不會被一堆 if else 檢查而干擾.
透過正確使用 Option 我們可以學習到:

  1. 分離資料和行為
  2. 將資料放入context
  3. 利用 flatMap, map 轉換context裡面的值

衍生需求

最後一個版本可以發現
payload不正確或某個國家的使用者為零

結果竟然都是None,這樣會造成使用者體驗不佳和維護上的困難.那我們可以怎麼改善呢?

可以改用 Try 或 Either 來表達錯誤,在這邊使用 Option 來表示parse完的結果不太洽當,主要是展示可以透過compse方式來串接多個function,下一篇將改用 Try 或 Either ,讓前端可以清楚知道錯誤訊息.

參考:

  1. Introduction to Algebraic Types in Scala

[Java] Java is Pass by Value and Not Pass by Reference

Posted on 2016-12-09 | Edited on 2016-12-13 | In Java |

Java到底是pass by value還是pass by reference?說法眾說紛紜,後來看到這篇文章Java is Pass by Value and Not Pass by Reference後,觀念才整個釐清。

Java是pass by value!

範例:

1
2
3
4
5
6
7
8
9
10
11
12
13
14
15
16
17
18
19
20
21
22
23
24
25
26
27
28
29
30
31
32
33
34
35
36
37
38
39
40
41
42
43
44
45
46
47
48
49
50
public class Balloon {

private String color;

public Balloon() {
}

public Balloon(String c) {
this.color = c;
}

public String getColor() {
return color;
}

public void setColor(String color) {
this.color = color;
}

public static void main(String[] args) {
Balloon red = new Balloon("Red");
Balloon blue = new Balloon("Blue");

swap(red, blue);
System.out.println("red color=" + red.getColor());
System.out.println("blue color=" + blue.getColor());

foo(blue);
System.out.println("blue color=" + blue.getColor());

}

private static void foo(Balloon balloon) {
balloon.setColor("Red");
balloon = new Balloon("Green");
balloon.setColor("Blue");
}

public static void swap(Object o1, Object o2) {
Object temp = o1;
o1 = o2;
o2 = temp;
}

public static void swap1(Balloon o1, Balloon o2) {
String temp = o1.getColor();
o1.setColor(o2.getColor());
o2.setColor(temp);
}
}

結果:

1
2
3
4
5
6
7
8
9
//使用swap()
red color=Red
blue color=Blue
blue color=Red

//使用swap1()
red color=Blue
blue color=Red
blue color=Red

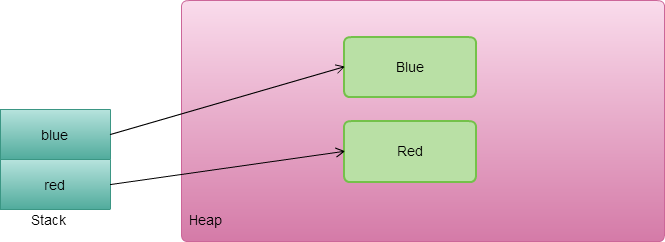
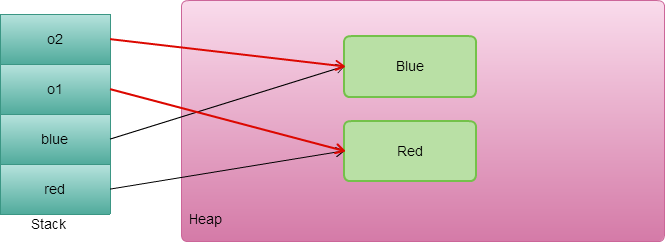
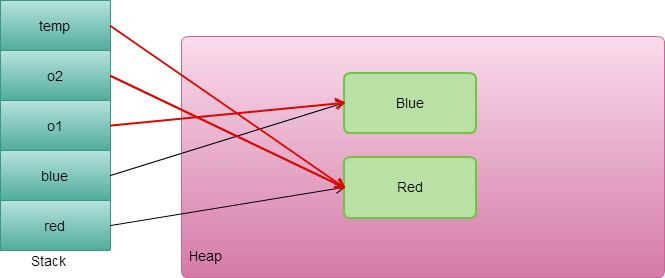
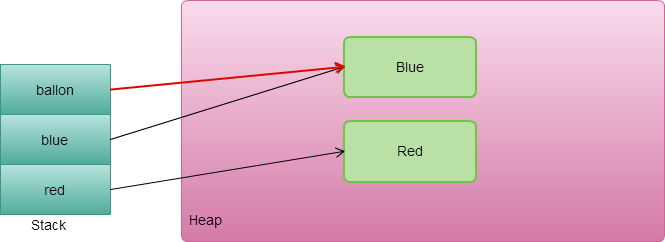
分析:

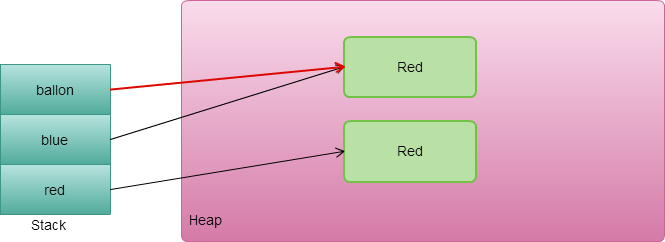
  1. 尚未執行swap():
  2. 執行swap(),o1指向red,o2指向blue:
  3. swap()執行結束,原本的物件並沒有互相交換:
  4. 執行foo(),ballon指向blue:
  5. 執行foo()第一行,透過原本物件的setter method修改值:
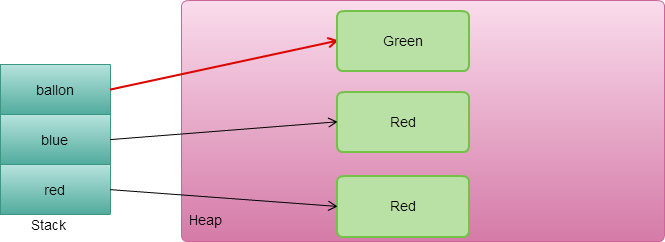
  6. 執行foo()第二行:
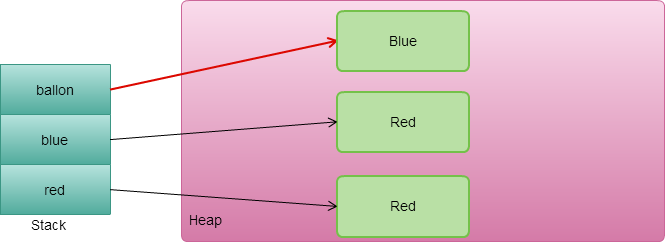
  7. 執行foo()第三行:

因為Java是採用pass by value作法,當以物件作為參數傳入到method,在method裡面想要修改物件的值,需透過物件的setter method,這樣原本物件的值才會連帶一起變更。透過assign(=)或new等方式,原本物件的值都不會有變化。

參考資料:

  • Java is Pass by Value and Not Pass by Reference

[Java] Java String Pool

Posted on 2016-12-09 | Edited on 2016-12-13 | In Java |

假如沒有string pool這樣的機制,遇到string就建立一個物件,這樣記憶體就很快就會爆掉了。

在java中採取Flyweight pattern作法,可以共享同樣的string object。

建立string object有兩種方式:

  1. String string = “Cat”;
  2. String string = new String(“Cat”);

採用第一種方法,會先檢查string pool是否有相同的string。若有就共用,沒有則建立之。

採用第二種方法﹐不會使用到string pool機制,而是在heap建立一個新的string object。若之後想要使用string pool機制,可以使用intern。

範例:

1
2
3
4
5
6
7
8
9
10
11
12
13
public class StringExample {

public static void main(String args[]) {
String s1 = "Cat";
String s2 = "Cat";
String s3 = new String("Cat");

System.out.println("s1 == s2 ?" + (s1 == s2));
System.out.println("s1 == s3 ?" + (s1 == s3));
System.out.println("s1 == s3.intern() ?" + (s1 == s3.intern()));
System.out.println("s1 equals s3 ?" + s1.equals(s3));
}
}

結果:

1
2
3
4
s1 == s2 ?true
s1 == s3 ?false
s1 == s3.intern() ?true
s1 equals s3 ?true

參考資料:

  • What is Java String Pool?

[SQL] How to get rank using ANSI SQL

Posted on 2016-12-09 | Edited on 2016-12-13 | In SQL |

要對分數做排名,最直接的想法就對它們做ORDER BY。但是當分數有重複時候排名是要一樣,這時候ORDER BY就發揮不了作用。

不同的廠商的資料庫有提供不同的函數可以解決這個問題,假如沒有使用函數該如何做到呢?

建立資料表:

1
2
3
4
5
6
CREATE TABLE `golf` (
`id` int(11) NOT NULL AUTO_INCREMENT,
`name` varchar(45) DEFAULT NULL,
`score` int(11) DEFAULT NULL,
PRIMARY KEY (`id`)
);

新增資料:

1
2
3
4
5
6
7
INSERT INTO `golf`(`name`,`score`) VALUES (A,74);
INSERT INTO `golf`(`name`,`score`) VALUES (B,79);
INSERT INTO `golf`(`name`,`score`) VALUES (C,79);
INSERT INTO `golf`(`name`,`score`) VALUES (D,82);
INSERT INTO `golf`(`name`,`score`) VALUES (E,89);
INSERT INTO `golf`(`name`,`score`) VALUES (F,89);
INSERT INTO `golf`(`name`,`score`) VALUES (G,98);

查詢:

1
2
3
4
5
6
7
8
9
10
11
12
13
14
15
16
SELECT 
tmp.name,
tmp.score,
(SELECT
COUNT(*) + 1
FROM
(SELECT
golf.score
FROM
golf
GROUP BY golf.score) AS tmp1
WHERE
tmp1.score > tmp.score) AS rank
FROM
golf AS tmp
ORDER BY tmp.score DESC;

結果:

1
2
3
4
5
6
7
8
name	score	rank
G 98 1
E 89 2
F 89 2
D 82 3
B 79 4
C 79 4
A 74 5

想法:

先從排名這個概念下手,假如有三個人的分數(這三人分數都不一樣)大於我的分數,那麼我就是排名第四。因為分數重複的排名是一樣的,需要先對分數做一次GROUP BY,再根據上述的概念去算出排名。

[Java] Synchronize in Java

Posted on 2016-12-09 | Edited on 2018-05-09 | In Java |

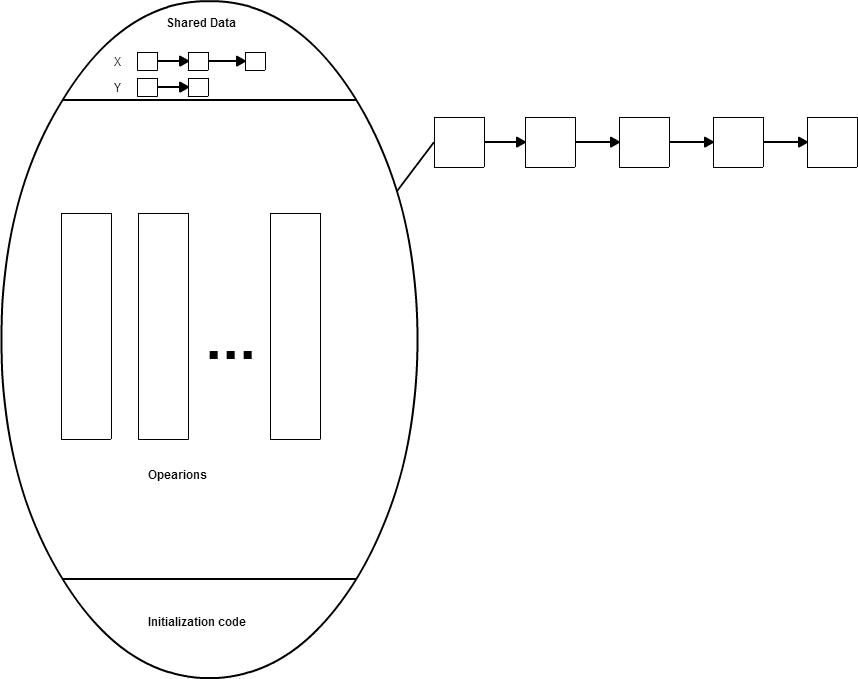
在了解Java的synchronized機制之前,先來複習一下Monitor。

可以把Monitor想像成它就是一個類別,裡面存放著共享變數、方法和建構子。
Monitor
Monitor會確保只有一個Process可以進入,其他也想要進入的Process,就必須在queue裡面等待。程式設計師可以根據不同的情況,決定是否要讓正在Monitor的Process進入waiting state或是喚醒其他在waiting state的Process。

例如:當某個Process取得Monitor的執行權利,在執行過程中發現不符合x情況,必須進入waiting state,可以使用x.wait()。想要喚醒x queue中的waiting Process,可以透過x.signal()。詳細可以參考Operating System Concepts。

Java的synchronized就是實作了Monitor,Object的wait()和notify()就相當於wait()和signal()。有了這樣的概念後,在使用synchronized就比較不會發生鎖錯對象的問題。

synchronized使用方式可以分為兩種:

  1. synchronized method
  2. synchronized block

範例

TargetObject.java:

1
2
3
4
5
6
7
8
9
10
11
12
13
14
15
16
17
18
19
20
21
22
23
public class TargetObject {
private static int count = 0;

public void method1() {
count++;
System.out.println(Thread.currentThread().getName() + " in method1 and count = " + count);
}

public void method2() {
count++;
System.out.println(Thread.currentThread().getName() + " in method2 and count = " + count);
}

public static void staticMethod1() {
count++;
System.out.println(Thread.currentThread().getName() + " in static method1 and count = " + count);
}

public static void staticMethod2() {
count++;
System.out.println(Thread.currentThread().getName() + " in static method2 and count = " + count);
}
}

Thread1.java:

1
2
3
4
5
6
7
8
9
10
11
12
13
14
15
16
17
18
19
20
public class Thread1 implements Runnable {
private TargetObject targetObject;

public Thread1(TargetObject targetObject) {
this.targetObject = targetObject;
}

@Override
public void run() {
while (true) {
this.targetObject.method1();
try {
Thread.sleep(1000);
}
catch (InterruptedException e) {
e.printStackTrace();
}
}
}
}

Thread2.java:

1
2
3
4
5
6
7
8
9
10
11
12
13
14
15
16
17
18
19
20
public class Thread2 implements Runnable {
private TargetObject targetObject;

public Thread1(TargetObject targetObject) {
this.targetObject = targetObject;
}

@Override
public void run() {
while (true) {
this.targetObject.method2();
try {
Thread.sleep(1000);
}
catch (InterruptedException e) {
e.printStackTrace();
}
}
}
}

Run.java:

1
2
3
4
5
6
7
8
9
public class Run {
public static void main(String[] args) {
TargetObject targetObject = new TargetObject();
Thread thread1 = new Thread(new Thread1(targetObject), "Thread1");
Thread thread2 = new Thread(new Thread2(targetObject), "Thread2");
thread1.start();
thread2.start();
}
}

執行結果:沒有做同步處理,會存在race condition。

1
2
3
4
5
6
Thread1 in method1 and count = 2
Thread2 in method2 and count = 2
Thread2 in method2 and count = 3
Thread1 in method1 and count = 4
Thread2 in method2 and count = 5
Thread2 in method2 and count = 6


synchronized method

在TargetObject.java中的method1和method2加上 synchronized 就可以鎖定由TargetObject類別所實體化的物件targetObject。

TargetObject.java

1
2
3
4
5
6
7
8
9
10
11
12
13
14
15
16
17
18
19
20
21
22
23
public class TargetObject {
private static int count = 0;

public synchronized void method1() {
count++;
System.out.println(Thread.currentThread().getName() + " in method1 and count = " + count);
}

public synchronized void method2() {
count++;
System.out.println(Thread.currentThread().getName() + " in method2 and count = " + count);
}

public static void staticMethod1() {
count++;
System.out.println(Thread.currentThread().getName() + " in static method1 and count = " + count);
}

public static void staticMethod2() {
count++;
System.out.println(Thread.currentThread().getName() + " in static method2 and count = " + count);
}
}

執行結果:

1
2
3
4
5
6
7
8
9
Thread1 in method1 and count = 1
Thread2 in method2 and count = 2
Thread2 in method2 and count = 3
Thread1 in method1 and count = 4
Thread2 in method2 and count = 5
Thread2 in method2 and count = 6
Thread1 in method1 and count = 7
Thread2 in method2 and count = 8
Thread2 in method2 and count = 9


為了更清楚了解鎖定的對象,現在先 移除 method1的synchronized,將同步機制移到Thread1.java。

Thread1.java

1
2
3
4
5
6
7
8
9
10
11
12
13
14
15
16
17
18
19
20
21
22
public class Thread1 implements Runnable {
private TargetObject targetObject;

public Thread1(TargetObject targetObject) {
this.targetObject = targetObject;
}

@Override
public void run() {
while (true) {
synchronized (targetObject) {
this.targetObject.method1();
try {
Thread.sleep(1000);
}
catch (InterruptedException e) {
e.printStackTrace();
}
}
}
}
}

執行結果:

1
2
3
4
5
6
7
8
9
Thread1 in method1 and count = 1
Thread2 in method2 and count = 2
Thread2 in method2 and count = 3
Thread1 in method1 and count = 4
Thread2 in method2 and count = 5
Thread2 in method2 and count = 6
Thread1 in method1 and count = 7
Thread2 in method2 and count = 8
Thread2 in method2 and count = 9

從執行結果可以看出上鎖的對象是在Run.java中實體化的 targetObject。


若將

  • Thread1.java中的 this.targetObject.method1() 改成 TargetObject.staticMethod1()。
  • Thread2.java中的 this.targetObject.method2() 改成 TargetObject.staticMethod2()。

必須對TargetObject的staticMethod1和staticMethod2做 synchronized 。
透過上述的方式可以知道synchronized static method是鎖定 TargetObject.class。


synchronized block

1
2
3
synchronized(想要鎖定的物件或是class literal){
//do something
}

synchronized block較有彈性,可以選擇鎖定的對象。
Thread1.java:

1
2
3
4
5
6
7
8
9
10
11
12
13
14
15
16
17
18
19
20
21
22
23
24
public class Thread1 implements Runnable {
private TargetObject targetObject;
private byte[] lock;

public Thread1(TargetObject targetObject, byte[] lock) {
this.targetObject = targetObject;
this.lock = lock;
}

@Override
public void run() {
while (true) {
synchronized (this.lock) {
this.targetObject.method1();
try {
Thread.sleep(1000);
}
catch (InterruptedException e) {
e.printStackTrace();
}
}
}
}
}

Thread2.java:

1
2
3
4
5
6
7
8
9
10
11
12
13
14
15
16
17
18
19
20
21
22
23
24
public class Thread2 implements Runnable {
private TargetObject targetObject;
private byte[] lock;

public Thread2(TargetObject targetObject, byte[] lock) {
this.targetObject = targetObject;
this.lock = lock;
}

@Override
public void run() {
while (true) {
synchronized (this.lock) {
this.targetObject.method2();
try {
Thread.sleep(1000);
}
catch (InterruptedException e) {
e.printStackTrace();
}
}
}
}
}

Run.java:

1
2
3
4
5
6
7
8
9
10
11
public class Run {

public static void main(String[] args) {
TargetObject targetObject = new TargetObject();
final byte[] lock = new byte[0];
Thread thread1 = new Thread(new Thread1(targetObject, lock), "Thread1");
Thread thread2 = new Thread(new Thread2(targetObject, lock), "Thread2");
thread1.start();
thread2.start();
}
}

在使用synchronized的時候,務必要搞清楚鎖定的對象,沒有搞清楚反而等同於沒有同步。

[SQL] 5 types of SQL JOIN

Posted on 2016-12-09 | Edited on 2016-12-13 | In SQL |

ANSI-standard SQL有五種JOIN:

  1. INNER JOIN
  2. LEFT OUTER JOIN
  3. RIGHT OUTER JOIN
  4. FULL OUTER JOIN
  5. CROSS JOIN

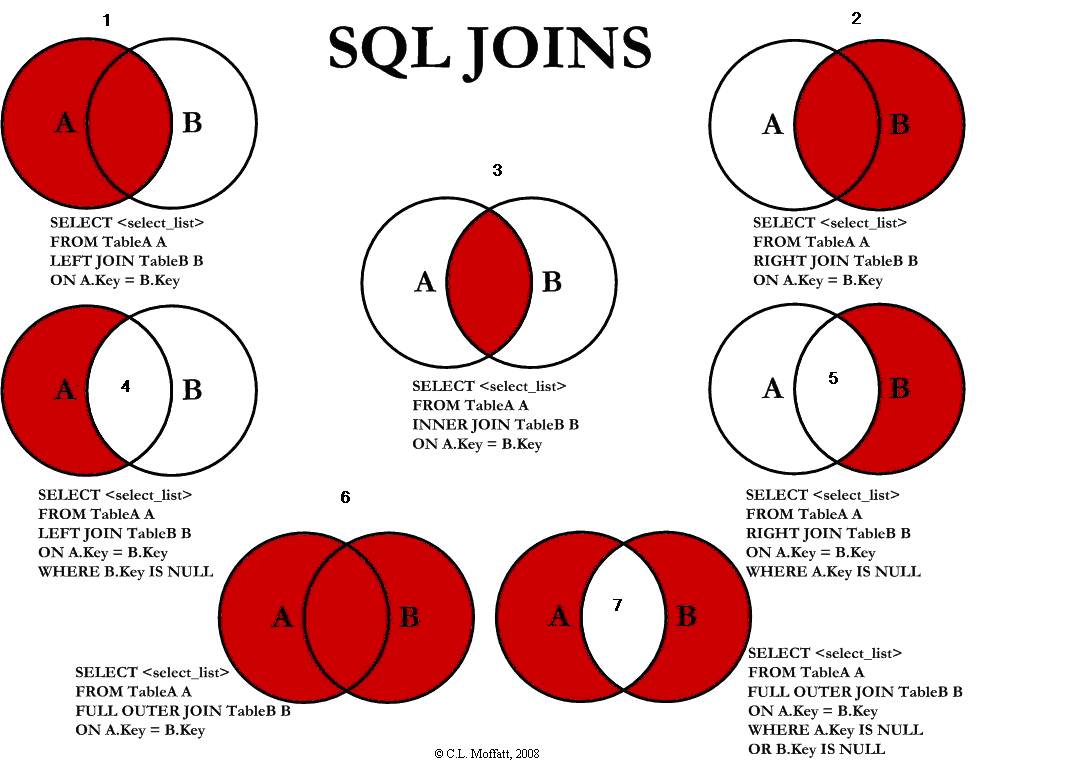
A Visual Explanation of SQL Joins用Venn diagrams方式圖解JOIN。

範例:

1
2
3
4
5
6
7
TableA        TableB
id name id name
-- ---- -- ----
1 Pirate 1 Rutabaga
2 Monkey 2 Pirate
3 Ninja 3 Darth Vader
4 Spaghetti 4 Ninja
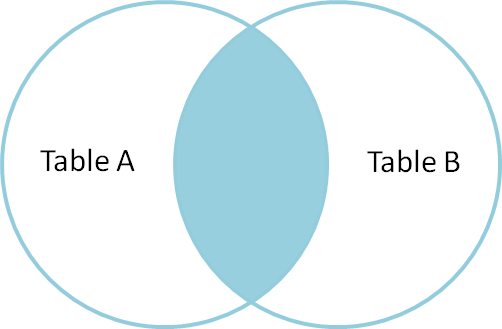
  • INNER JOIN:

SQL:

1
2
3
SELECT * FROM TableA
INNER JOIN TableB
ON TableA.name = TableB.name

結果:

1
2
3
4
5
TableA         TableB
id name id name
-- ---- -- ----
1 Pirate 2 Pirate
3 Ninja 4 Ninja

Venn diagram:

列出兩個Table共有的資料,即兩個Table的交集。


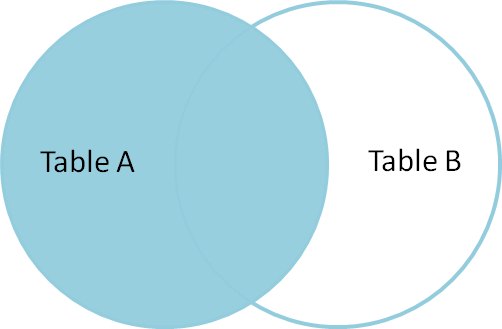
  • LEFT OUTER JOIN:

SQL:

1
2
3
SELECT * FROM TableA
LEFT OUTER JOIN TableB
ON TableA.name = TableB.name

結果:

1
2
3
4
5
6
7
TableA         TableB
id name id name
-- ---- -- ----
1 Pirate 2 Pirate
2 Monkey null null
3 Ninja 4 Ninja
4 Spaghetti null null

Venn diagram:

以左邊Table為主,若沒有配對到資料,顯示null。


  • RIGHT OUTER JOIN:

跟LEFT OUTER JOIN大同小異,結果改成以Table B為主,不再贅述。


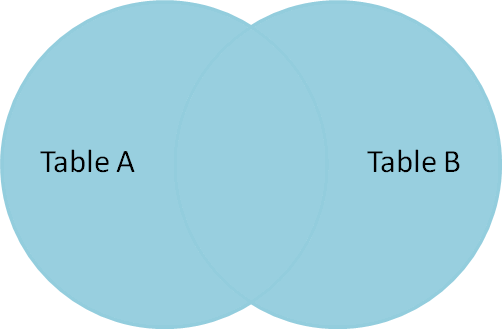
  • FULL OUTER JOIN:

SQL:

1
2
3
SELECT * FROM TableA
FULL OUTER JOIN TableB
ON TableA.name = TableB.name

結果:

1
2
3
4
5
6
7
8
9
TableA           TableB
id name id name
-- ---- -- ----
1 Pirate 2 Pirate
2 Monkey null null
3 Ninja 4 Ninja
4 Spaghetti null null
null null 1 Rutabaga
null null 3 Darth Vader

Venn diagram:

為兩個Table的聯集,若沒有配對到資料以null顯示。


  • CROSS JOIN:
    即是Cartesian product,會產生兩個Table所有的組合。
    SQL:
    1
    2
    SELECT * FROM TableA
    CROSS JOIN TableB

結果:
4*4 = 16種組合

因為CROSS JOIN會將所有組合列出來,所以當資料量龐大時候,效能會變得很差。

總結:

可以利用以上的五種JOIN和過濾方式,對兩個集合進行交集、聯集、差集等操作。
SQL JOINS

參考資料:

  • A Visual Explanation of SQL Joins
  • Join (SQL))
  • 圖解SQL的Join 
  • Visual Representation of SQL Joins

The Law of Demeter

Posted on 2016-12-09 |

更詳細的說法是“Law of Demeter for Functions/Methods” (LoD-F),簡單化Object之間的互動,讓多個Object不要互相相依。

定義:

The Law of Demeter for functions requires that a method M of an object O may only invoke the methods of the following kinds of objects:

  1. O itself
  2. M’s parameters
  3. Any objects created/instantiated within M
  4. O’s direct component objects
  5. A global variable, accessible by O, in the scope of M

範例:

1
2
3
4
5
6
7
8
9
10
11
12
13
14
15
16
17
18
19
20
21
22
23
24
25
26
27
28
29
30
31
32
33
34
35
36
/**
* A Law of Demeter example in Java.
* Created by Alvin Alexander, <a href="http://devdaily.com" title="http://devdaily.com">http://devdaily.com</a>.
* This is an adaptation of the source code example from the book
* The Pragmatic Programmer.
*/
public class LawOfDemeterInJava
{
private Topping cheeseTopping;

/**
* Good examples of following the Law of Demeter.
*/
public void goodExamples(Pizza pizza)
{
Foo foo = new Foo();

// (1) it's okay to call our own methods
doSomething();

// (2) it's okay to call methods on objects passed in to our method
int price = pizza.getPrice();

// (3) it's okay to call methods on any objects we create
cheeseTopping = new CheeseTopping();
float weight = cheeseTopping.getWeightUsed();

// (4) any directly held component objects
foo.doBar();
}

private void doSomething()
{
// do something here ...
}
}

參考資料:

  • Law_of_Demeter
  • Law of Demeter - Java examples
12…4

pandaforme

This is a programming blog

33 posts
7 categories
17 tags
RSS
GitHub Linkedin
© 2018 pandaforme
Powered by Hexo v3.7.1
|
Theme — NexT.Gemini v6.2.0